

I want to know everything about roman blinds
Roman blinds are a popular favourite among conscious homeowners as they offer an elegant, stylish and affordable solution to dressing windows. Simple in their construction and to use, Roman blinds coordinate your room or interior design scheme with a myriad of plain or patterned options. There's an extensive and varied range of fabrics to choose from, and many available from Blinds Hut that are suitable for stylish, durable and affordable Roman blinds. They can even be made-to-measure at the click of a button, so they're the perfect size and style for your home.
- What is a Roman blind?
- Can Roman blinds be made from any fabric at all?
- What kinds of linings or shadings are available on Roman blinds?
- Am I limited on size if I want my Roman blind to be made using normal curtain fabric?
- Are Roman blind tracks different from curtain tracks and what is a cassette header rail?
- Where can Roman blinds be used and are they OK for kitchens and bathrooms?
- Do I have to get my own track if I’m ordering a made-to-measure blind?
- I’m nervous about submitting measurements for a made to measure item, can you advise?
- How do I decide whether to have my Roman blind inside or outside my window?
- I want Roman blinds but have been told they don’t work well in bay windows, is this true?
What is a Roman blind?
Roman blinds are simple, elegant and contemporary blinds which hang straight and flat when down, and form soft pleats when raised. They are operated using a series of vertical cords and are normally tailor made to size from good quality curtain fabric. Unlike more modern day counterparts such as vertical and roller blinds, Roman blinds have been around for decades, even centuries in fact, long since providing a practical and aesthetic solution to dressing windows.
A Roman blind is essentially an envelope made from a flat piece of fabric and a lining. The lining is securely attached to the fabric on all sides to create a sealed pocket or envelope. This envelope hangs flat once installed at a window in the fully extended (or closed) position. In the fully raised (or open) position, the fabric in a Roman blind sits in crisp, neat, horizontal folds which stack one on top of another. These pleats are formed by inserting dowels (slim wooden, plastic or metal rods) into channels or tapes which are formed across or stitched horizontally onto the back of the blind at regular, calculated intervals down the length of the blind. A series of cords equally spaced across the width of the blind are then threaded vertically down the blind through the tapes or channels and are securely attached to the bottom tape or channel. The blind is then attached to a header rail which is usually a metal track or a wooden baton. The top of the blind cords are threaded through hooks or cord carriers in the header rail and guided to either the left side or right side of the blind as desired, where they all come together to create leverage in a similar way to a pulley system.
When the cords are all pulled simultaneously together, the bottom dowel is raised up to meet the next dowel above, creating a fold in the fabric and so on up the blind until it is in its fully raised (or open) position. The rods and tapes (or channels) are discreetly hidden from sight and not visible from the front of the blind. It is the simple and neat but effective construction technique of Roman blinds that makes it possible to manufacture them in such a wide variety of fabric weights and textures; and apart from their attractive, versatile and accommodating looks, this is what has made Roman blinds one of the most popular types of window dressing for many, many centuries.
Can Roman blinds be made from any fabric at all?
When it comes to choosing fabric for Roman blinds, your choice in materials is almost as unlimited as your choice of colour and pattern. But there are one or two types of fabrics to avoid if you want your blind to work properly and give you some longevity.

Within reason Roman blinds can be made from more or less any good quality curtain fabric to co-ordinate or contrast with your colour scheme. It may be that you simply want to add a splash of block colour with a plain fabric, or follow a theme with a pictorial fabric. You could even use a matching fabric to co-ordinate with other furnishings in the room, or simply add some interest with a luxurious textured fabric - such as a jacquard, a chenille or even a velvet maybe?
Recommended Fabrics
Roman blinds are very accommodating when it comes to different fabric weights and thicknesses. A thin and lightweight faux silk or taffeta fabric for example, would make a sharp and crisp looking lightweight Roman blind, with little bulk created by the stack of folds and a would show off to best effect the smooth lustre or shine of these types of fabric. Medium weight fabrics such as woven or printed cottons or polycottons, linen or linen mix fabrics and jacquards and damasks are all ideal weight fabrics Roman blinds. Not only do they offer a myriad of colour, style and pattern options, but durability as well. Crisp cottons in particular suit Roman blinds exceptionally well, as non-stretch fabrics such as these provide a wonderfully stable base material for making beautifully sharp, straight and true, edges and folds.
Heavier weight chenilles and velvets, or even pure wool fabrics, should not be discounted for Roman blinds though, as they too can be accommodated by the simple making up procedure and operating system of Roman blinds. A luxurious chenille for example could give a very sumptuous or robust look to a Roman blind and could be well suited to the interior of a period style home; or could simply offer a practical solution for draughty or ill fitted windows by offering effective, additional insulation. The folds created in a Roman blind made in a heavier fabric such as chenille or velvet would not look as crisp and sharp, or lie as flat, as a medium weight cotton perhaps would, as mentioned above; but would instead look soft and full, giving a very desirable opulent or voluptuous look to the blind, would provide longevity and have no detrimental effect on the effective use and operation of the blind.
Fabrics to avoid
It's hard to get it wrong when choosing suitable fabrics for made-to-measure Roman blinds, but to make sure you’re fully informed and you don’t make any costly mistakes, here’s a few to avoid: Roman blinds can be made in pure silk, but it is not recommended as pure silk is adversely affected by any amount of exposure to strong sunlight or moisture. Both of these are obviously going to be factors at your windows and can cause silk to fade or even rot very quickly, so if you want to stay chic at your windows and not shabby then it is best to avoid delicate fabrics like silk which won’t give you any durability or resilience.
Oil cloth and PVC’s
Oil cloths, vinyl fabrics and pvc’s (fabrics with a thick water proof or gloss coating) are most definitely a no-no for Roman blinds. Their oil based or pvc coatings make them stiff and therefore difficult to manipulate into soft folds. In addition the coatings would create excessive friction, almost giving the fabric a ‘sticky’ effect which would prevent them from the Roman blind from working properly; ultimately putting undue stress on the blind and the operating system or track.
Leatherette
Faux leather fabrics known as leatherette are not suitable for Roman blinds either. They would be difficult to operate for the same reasons as oil cloths and pvc fabrics, are too thick and bulky to fold effectively and do not stitch easily; but despite their robust nature would also be susceptible to ripping or tearing at any stitching points, with continual use. Faux suede would be much more suitable choice, as it is an altogether softer and much more pliable and accommodating material.Upholstery fabric
Upholstery fabrics in general, but in particular heavy weight upholstery fabrics, should also be avoided for Roman blinds. Upholstery weight fabrics can be very thick in their make-up to give them durability and good wear and tear resistance, but in addition are usually treated with a fire retardant chemical using a process of either dipping or back-coating the fabric. This process makes the fabric very stiff, rendering it unsuitable for either curtains or blinds, as it prevents the fabric from folding or draping softly.
Stretch knits
Any fabric that has a knitted, stretch weave should be avoided for Roman blinds. Roman blinds are essentially squares or rectangles which need to be cut and made with true, straight edges. Any fabric with a stretch weave would hamper this accurate making process as its potential to stretch would make achieving an accurate finished size with straight edges difficult if not impossible. The potential for the fabric to stretch further during continual use could also result in your Roman blind going out of shape and subsequently looking shabby or being difficult to operate.
Voiles or sheers
Lightweight voiles or sheers are not recommended for Roman blinds due to their transparent nature. Whilst their lightweight fibres would give a soft hang and nice folds, the see through qualities of these types of fabrics cause a number of issues with making Roman blinds. Firstly, Roman blinds need to be lined and putting an opaque lining fabric behind a see through fabric obviously obliterates it transparent qualities and therefore defeats the object of selecting a sheer fabric. Secondly, if a Roman blind was manufactured in a sheer fabric with no lining, or lined in itself, the tapes or channels which hold the dowels and all the strings which run up the back of the blind would be visible through the face of the blind when it was it its fully extended (closed) position, which is not a desirable effect.Pure silk
Roman blinds can be made in pure silk, but it is not recommended as pure silk is adversely affected by any amount of exposure to strong sunlight or moisture. Both of these are obviously going to be factors at your windows and can cause silk to fade or even rot very quickly, so if you want to stay chic at your windows and not shabby then it is best to avoid delicate fabrics like silk which won’t give you any durability or resilience.
Select with confidence
We’re passionate about blinds at BlindsHut and when it comes to Roman blinds in particular, we can call upon over 40 years of experience, not only in making Roman blinds, but thanks to the combined knowledge of our expert buying team, also in selecting and purchasing high quality fabrics which are ideally suited to the make-up and manufacture of beautifully hand tailored made to measure Roman blinds.
We have taken great care in putting together a carefully selected range of fabrics ideally suited to Roman blinds so that at BlindsHut you know that you can select with confidence from any one of the hundreds of beautiful fabrics which make up our vast and varied range of options. And with easy find search options built in so that you can select by colour, fabric type or pattern; and a simple checklist ordering process, it couldn’t be easier to find exactly what you’re looking for in a Roman blind.
What kinds of linings or shadings are available on Roman blinds?
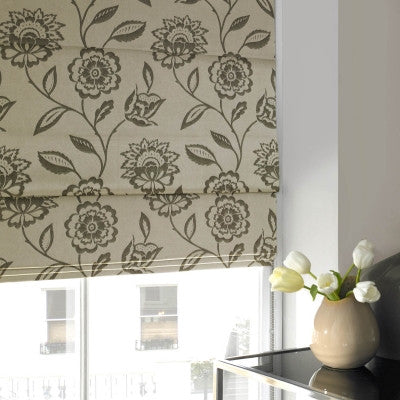
For Roman blinds to be made properly and offer durability they need to be lined in a good quality lining fabric. The lining is very important and serves a number of purposes. It gives shape and stability to the face fabric, allowing skilled seamstresses to achieve vitally accurate finished measurements. The lining also protects the face fabric from sun damage and fading or any moisture present at the window.
Roman blind tapes and cords
The lining on a Roman blind also plays host to the tapes or stitched channels which hold the dowel rods and operating cords in place. The tapes are usually white or cream and lining options are usually white or cream too; and as it is the lining side of the blind that is visible through your windows from outside when they are in the closed position, the tapes and cords do not look too obvious against the light coloured lining, so your blind looks as smart and professional from the back as it does from the front.
Avoid coloured linings
Coloured linings are not recommended as sun damage can create a faded, striped, effect across the back of the blind and if tapes are used rather than channels or casings for the dowel rods, then white or cream tape does not look at all attractive against bright or deep coloured lining fabric, from the outside of the window.
Roman blind and "shading"
Linings also play a vital role in the type of shading your blind creates for your window. Normal cotton or polycotton linings will give what is referred to as standard shading to your Roman blind. It will protect the back of the face fabric from sun damage but will prevent little, if any more, light diffusing through than the face fabric itself. This is of benefit if you have a room which gets a lot of sun maybe and you need to lower the blind during the day to reduce the level of sun glare, but without actually darkening or blacking out the room too much.Blackout linings
Blackout (sometimes known as blockout) lining does exactly what its name suggests, however, and blocks light from passing through the face fabric. Blackout linings are therefore recommended on Roman blinds for windows where good levels of sun block are required, such as bedroom windows. Blackout is also recommended on very lightweight or thin fabrics such as faux silk, taffeta and very light weight cottons. These fabrics tend to take on a slightly transparent appearance with sun or daylight behind them and it is possible at times to see the side seams, dowel tapes or operating cords through them when they are in the fully extended (closed) position, which is not a desirable effect.

In addition, these fabrics have a very close and smooth weave, but are susceptible to slubs (small lumps of thread trapped in the weave) which can be seen as dark patches; or plucks which can create tiny holes in the weave which become very visible with strong daylight behind them. Using a blackout lining on these types of lightweight fabric therefore prevents either of the above two issues from being overly noticeable as well as giving some body and stability to the blind.
Modern day blackout linings are not overly thick or bulky though so don't be concerned that adding them to your blind will detract in any way from the light, delicate look, sheen and crispness of such lightweight fabrics. Far from being detrimental to these fabrics they are actually beneficial. Another instance where blackout lining would be beneficial and advisable on Roman blinds, is on wide blinds where more than one width of fabric is necessary. In this instance fabric widths are joined with a neat narrow seam. These seams however, can be visible through the face fabric of the blind if used with a standard lining. Blackout lining will again prevent any light from penetrating through the blind and eliminate any potential shadow lines from the seams.
Our recommendation
At BlindsHut we offer a select choice of three ideally suitable, quality linings to help make your selection both easy and suitable. Choose from standard polycotton lining in cream only, luxury cotton sateen in white or cream, or supersoft blackout in white or ivory. Simply make your selection from our drop down menu as you progress through our simple ordering system.
Am I limited on size if I want my Roman blind to be made using normal curtain fabric?
Yes, you might. The majority of curtain fabrics are approximately 138cm (54") wide and it would be logical to assume that this would limit the width of your blind and therefore which windows in your home you could fit Roman blinds in. At BlindsHut we offer quality made to measure Roman blinds right up to a maximum width of 300cms (118"). This requires more than one width of curtain fabric to be used, but your fabric will be neatly joined and perfectly pattern matched where necessary, to achieve your required width. The blind will be made with a full panel of fabric in the center with two equally sized sections to either side of the joins.

We will never put a seam directly down the center of a Roman blind as this would look less than stylish and very unprofessional. So if you have wide windows in your home and had dismissed the possibility of having Roman blinds as a suitable and attractive window dressing then grab hold of atape measure, double check your sizes and reconsider. Tailor made, simplistic and stylish Roman blinds made in one of our beautiful fabrics could be just the solution that you're looking for.
Are Roman blind tracks different from curtain tracks and what is a cassette header rail?
Roman blinds have been around as popular and stylish window treatments for centuries. Once upon a time, before modern engineering possibilities evolved, they would have been fitted on nothing more than a piece of wooden baton with a few eye hooks screwed into the bottom edge to carry the operating cords. The cords were then wound around a simple double-ended hook known as a cleat hook, to keep them neat and tangle free and to keep the blind in the fully raised position. Thankfully though, we have progressed quite a way since then and advancements in technology and modern day manufacturing techniques (combined with increased health and safety awareness) have led to the evolution of metal tracks (also referred to as header rails), purposely manufactured for Roman blinds.

Curtain tracks have a different make up and operating system to Roman blind tracks and are not suitable for mounting Roman blinds on. For many years an aluminium Roman blind track system has been available, consisting of a simple, flat, aluminium track with a Velcro friendly front. Plastic cord carrier loops are suspended beneath the track to channel the cords through and a locking mechanism is supplied for one end of the track. This locking mechanism works by trapping the cords between a small pulley wheel system and means that the blind is not only really easy to operate, but can be fixed at any height between the fully lowered and fully raised position, without the need to wrap the excess cords around a cleat hook. Use of the cleat is till recommended, however, for health and safety reasons, so that there are no excess cords hanging around loosely. These aluminium Roman blind tracks are more often than not referred to these days as ‘standard’ Roman blind tracks and do the job for which they are intended very well and will cope with light to medium/heavy weight fabrics and small to medium sized blinds adequately. However, as with most things these days, bigger, better and more improved versions have evolved and the most popular kind of tracks for installing Roman blinds on are now specially developed tracks referred to as ‘Cassette Header Rails’ or ‘Deluxe Sidewinder Headrails’. Cassette header rails are clever, effective and discreet, enclosed track systems consisting of a hollow ‘U’ shaped metal tube (track), inside which a series of cassette disks or pulleys are hidden. A central steel bar runs through the length of the track and through the centre of the cassette pulley. Each cassette has a pre-determined length of strong cord wound around it and a side winder pulley at one end of the cassette track is operated by a continuous bead chain mechanism which turns the central bar; thus turning the cassettes and winding or unwinding the cords, (depending on the direction in which the chain is pulled) to raise and lower the Roman blind once it is made and the cords have been threaded down through the tapes and dowels on the back of it.

Cassette header rails look quite robust and bulky compared to the standard aluminium Roman blind tracks but are completely hidden by the Roman blind once installed so look neat and professional; and although they are actually quite lightweight in their construction, are very strong and reliable. The cords do not wear as easily as with standard tracks because the individual cassette pulleys put less stress on the cords and for this reason as well as their strength, cassette header rails are extremely well suited to very wide or very long blinds and heavier weight fabrics. And because all the cords are hidden inside the header rail (wrapped around the cassette pulleys) when the blind is in the fully raised (open) position, there are no excess cords to be stored around a cleat hook. The sidewinder chain operates the blind by winding the cords up and down, rather than having to pull on all the cords grouped together at one end of the track, as with the standard Roman blind track system. So not only does this make for a much better and much more reliable operating system, but also improves health and safety considerations as well. Sidewinder (cassette) header rails are supplied with a safety clip or hook which anchors the beaded chain at the end of the header rail securely to the wall under slight tension, greatly reducing the risk of accidents by strangulation. You will find that with certain fabric ranges in our made to measure Roman blind collections will offer the standard Roman blind track as an option, but ALL our roman blinds are available with a Deluxe Sidewinder Headrail option.
Where can Roman blinds be used and are they OK for kitchens and bathrooms?
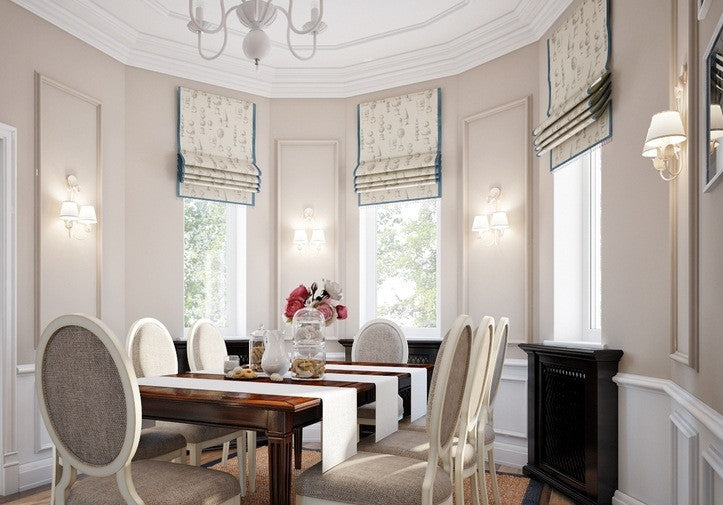
The simple ease of use, making-up process and varied choice of fabric weights and colours available for Roman blinds, makes them suitable for most rooms in the home. Roman blinds are great for achieving a sophisticated, contemporary look and have historically been favoured for living rooms, dining rooms, master-bedrooms & children’s rooms and home offices, as they offer a more dressy and furnished look than that of roller, vertical or Venetian blinds.

Roman blinds are not normally available in specialist moisture resistant or wipe-abe fabric finishes but can, with careful fabric selection and proper maintenance, be used in a kitchen or bathroom. Avoid completely plain fabrics which will show any stains or splashes, particularly plain faux silks and taffetas or luxurious velvets. 100% cotton and poly-cotton mix fabrics are your best choice for kitchens and bathrooms as they are durable and easier to maintain and care for. To help to keep your Roman blind in tip-top condition mount it, where possible, in a position where the back of the blind is not going to be in direct contact with any glass or tiled surfaces which could hold or moisture or condensation. Setting the blind forward slightly if it is being fitted inside the window recess for example, rather than at the back of the recess where it could come into contact with the glass is always beneficial in a kitchen or a bathroom. Roman blinds are frequently used in conservatories these days too, to again give a more furnished and luxurious look than roller or vertical blinds perhaps would. Here it is best to stick to lighter colour tones so that any sun damage is less visible in the long term. Dark or strong, vivid, colours will be highly susceptible to fading as regular exposure to strong sunlight will strip the colour out of them, so sticking to light or neutral shades is advisable.
Do I have to get my own track if I’m ordering a made-to-measure blind?
If you’re ordering a made to measure Roman blind from BlindsHut, all you need to do is select your fabric and lining type, give us your measurements, state which side you want your controls on and we do all the rest. You don’t need to make adjustments to your measurements for hems and seams allowances, you don’t need to allow for clearances if you’re fitting inside a window recess, you don’t need to assemble your blind or attach it to a track or baton when it comes; and you don’t need to purchase a track.

All our made to measure Roman blinds come ready to install and with everything that you need to fit and operate them, including the track (or header rail). Your blind will come fully lined, tailor made to your specific sizes and already attached to a luxury, durable, and easy to use cassette header rail (also known as a sidewinder headrail), or standard track where available; with all the cords already threaded and adjusted and complete with a safety retainer for the chain mechanism (or cords). For more information on safety precautions wit the chains and cords on Roman blinds see our guide on 'Blind Safety' > All you then need to do when you receive your fabulous new Roman blind from BlindsHut is follow the instructions on how to space and fit the brackets and then offer the header rail (track) with the blind already attached to it, up to the brackets and click or securely lock it into place. Roman Blinds are very simple to fit and even easier to operate. For more information and instructions on how to fit or measure for your Roman blind see our helpful and informative guides.
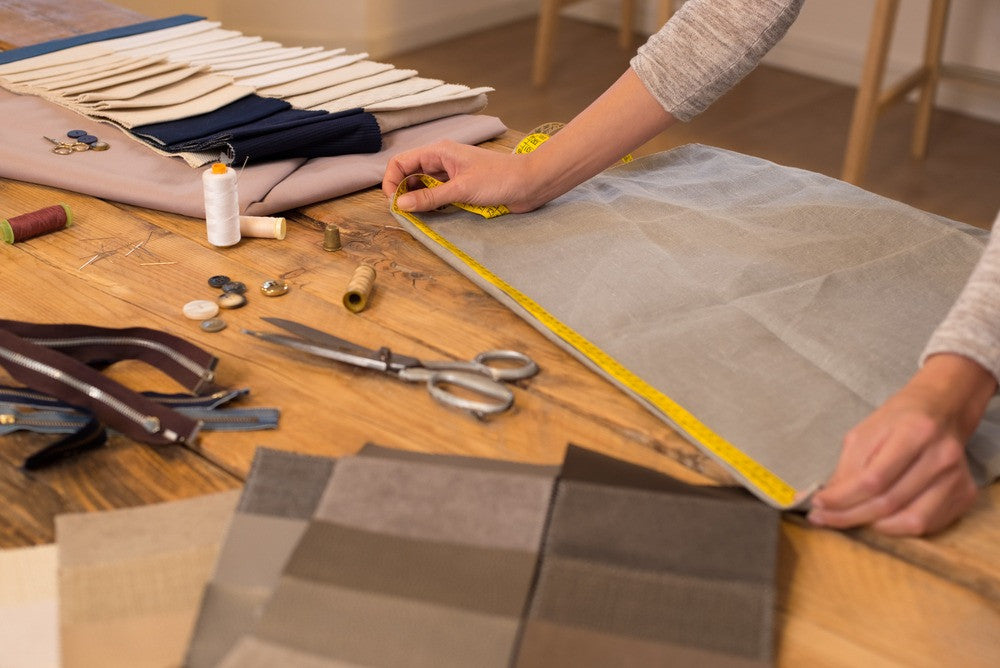
I’m nervous about submitting measurements for a made to measure item, can you advise?
The terms ‘made-to-measure’ or ‘tailor made’ cause concerns. However there’s nothing nicer than receiving a good quality, value for money and unique, tailor-made item that you know has been made to specific size, colour and texture for your home; so don’t let these concerns put you off ordering made to measure Roman blinds. Our vast range of fabrics offers something to suit everyone’s taste and budget and our simple step by step ordering system with drop down check-lists to prompt you at every step, plus an instant price calculator, guide you through the made to measure ordering process with ease and give you a clear and fixed idea of cost before you commit to anything or part with any money. And if you’re still in any doubt about your measuring skills then pop over to our comprehensive and dedicated guide on ‘How to measure for Roman Blinds >How do I decide whether to have my Roman blind inside or outside my window?
Once you’ve decided that Roman blinds are the best style of blind for you, the next step is to decide whether to install your blind on the inside of your window recess or the outside? This can be entirely down to personal choice, or may be determined by a number of contributing factors. So here are a few pointers and things to think about that might help you to make the decision.Small Window or Poor Light Source
If you have a room with a poor light source or a very small window, then maximizing on the amount of natural light available in the room is always a good idea. This means not obstructing the natural light source where possible and this is a situation where your Roman blind would be better suited to being fitted outside and above the window recess, if the wall space and no other obstructions allow. Mounting the blind far enough above the window to accommodate the stack depth (the measurement of the Roman blind from top to bottom when it is in the fully open, raised position), means it won’t have to sit directly against the window pain and will not therefore obstruct as much light as it would if it was mounted inside the window recess.Architectural Details
If you have a window that has, for example, a dado or picture rail which runs inside the recess, then it can sometimes be difficult to decide what width to make the Roman blind if you decide to fit it inside the recess. You would have to decide to either take the measurement of the width of the blind between the decorative feature, which would mean a considerable gap at either side of the blind when it was fitted, or take the full recess width measurement and accept that the finished blind will look a little uncomfortable where it knocks against the mouldings. Again in this instance it would be beneficial to fit the blind outside and above the recess to avoid any such issues.
Layered Curtains and Blinds, or Just Blinds
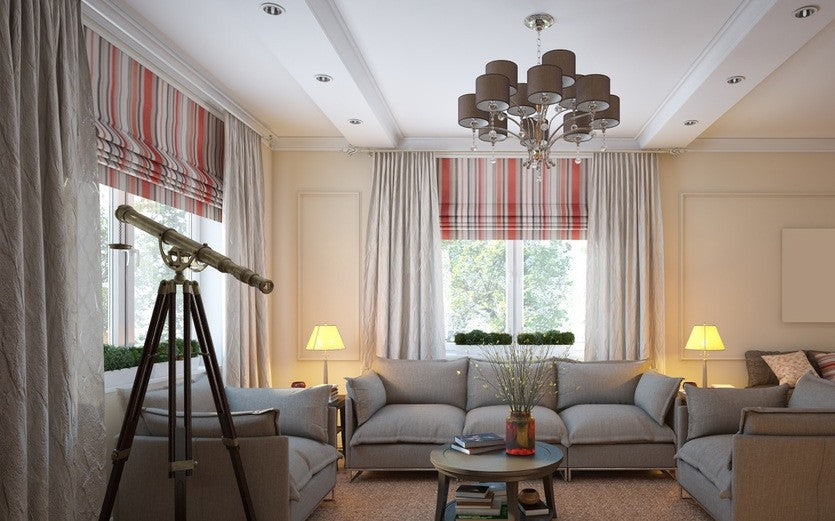
If you are intending to have a working blind and maybe dress curtains at your window, then the norm would be to mount the Roman blind inside the window recess and the curtains outside and above it. It is best to avoid mounting the blind outside of the recess and behind the curtains in this instance as the curtains could hamper the smooth operation of the blind.
If you are planning to have blinds only at your windows, particularly if you’re putting them in a living room, dining room or master bedroom, then it is often better to mount the blinds outside and above the recess. This makes for a more ‘dressy’ and furnished look to the windows as the bottom edge of the blind usually covers the top edge of the window recess. This takes the bareness off the room and adds a subtle softness to the windows.
Bathrooms, Kitchens & Moist Environments
Roman blinds are versatile and easy to use and for this reason are frequently favoured for kitchens and bathrooms. Roman blinds are, however, normally manufactured from curtaining fabrics rather than specialist laminated or moisture proof fabrics and don’t therefore have any special resistance to moisture. It is best where possible then to mount Roman blinds outside a window recess in a kitchen or bathroom, as this keeps the blind away from any surfaces that are prone to collect moisture such as glass or tiles. If it isn’t possible to fit the Roman blind outside the recess then it would certainly be beneficial to at least fit the blind forward slightly and more towards the front of the recess to keep it away from any glass or tiled surfaces and allow a good circulation of air around the blind.
Limited Wall Space To Either Side Of The Window
If you have little or no flat wall space to either side of your window then it may be better to consider mounting your Roman blind inside the recess. Ideally Roman blinds mounted outside of a window recess should extend a bare minimum of 5cms (2 ½ “) to either side of the window. 7 to 10 cms (3-4”) is the recommended amount for the blind to look comfortable and to prevent too much light from ‘creeping’ around the sides of the blind when it is down in the fully extended position. If you have less than the bare minimum of 5cms of wall space available then the blind would look better mounted inside the recess.I want Roman blinds but have been told they don’t work well in bay windows, is this true?
Bay windows are notoriously hard to dress with any kind of window treatment, but with careful planning, proper consideration and a bit of expert know-how, you can stylishly dress bay windows with Roman blinds just as effectively as you can with curtains; and often with less effort or expense. A little bit of consideration just has to be given to the corners and angles of your bay, combined with a little bit of careful measuring, so don’t be put off having Roman blinds at your bay windows, just take a look at our helpful guide below:
Planning and Measuring Roman Blinds for Bay Windows
Bay windows can usually be categorized into three types - splayed, boxed and curved. Each of which carries specific guidelines of how to measure your window for the blind, as well as fitting instructions. Here are a few things to keep in mind.
Splayed Bay Window
A splayed bay, also known as an angled bay, is usually a three sided bay consisting of a wider central section with a single, much narrower, window to either side. These two side windows are usually at an angle of approximately 45 degrees to the main window.
Boxed Bay Window
A boxed bay is also usually classed as a three sided bay and has a wider central section with a single, much narrower, window to either side, as with a splayed bay; but the two side windows are at an angle of 90 degrees to the main window, creating a square, boxed, or oblong shape to the window; and are probably the hardest shape of bay window to dress with any type of blind, not just Roman.
Curved Bay Window
A curved bay window usually has five or more sides (or sections), joined together at much shallower angles which follow the line of a curve. Planning and measuring for blinds inside a bay window usually involves measuring for an inside recess fit and calculating finished blind size measurements rather than supplying recess size measurements, so depending on which type of bay window you have, here’s a handy guide on how to do it: Pro Tip: The measurements which you will need to provide for a made-to-order Roman blind inside a window recess like a bay, need to be very accurate. Always use a good quality steel tape measure rather than a fabric one as fabric ones can stretch and give inaccurate measurements. Pro Tip: Measure twice order once! - Take your time measuring, double check your measurements and get your order right first time. Get someone else to measure with you where possible. You’ll get much more accurate measurements with someone else helping to hold the tape and you get a second air of eyes to help you check your measurements and calculations.Measuring The Drop
For any type of bay window the method for measuring the drop and establishing the finished blind length will be same, so start with the simplest task first. Measure from the top of the widow where it meets the ceiling of the bay, down to the sill and take this measurement as your finished blind length (or drop). There is not normally any need to knock anything off for clearance as it is desirable for the blind to fit flush at the top and bottom of the window to avoid any obvious light gaps. However, if you have a window sill that suffers particularly badly from condensation or damp then a small clearance of no more than 5mm (¼ “) can be left at the bottom of the blind to prevent it from touching the sill and drawing up any moisture which could affect the fabric at the bottom of the blind over a period of time.
Planning and Measuring for Roman Blinds in a ‘Splayed Bay’ Window
Before you measure to establish the widths of your three blinds, consider whether you want the inner side edges of the smaller side blinds to touch the side edges of the main centre blind, when the blinds are fully down in the closed position; or whether you would rather have a slight but obvious gap between them. Either way is acceptable and purely down to personal choice, however here are a couple of things to think about. Having the blind edges flush up to each other so that they touch when the blinds are down looks exceptionally neat and tidy and gives better light blocking, but can create a stacking issue when the blinds are in the open, fully-stacked position. The folds stack one on top of each other on Roman blinds and therefore a certain amount of bulk or volume is created at the top of the blind when it is pulled up. You could possibly be presented with a crushing issue here, where the stacks of folds at the top of the centre blind meet the stacks of folds on the side blinds, at the point where they meet in the angled corners of the bay window. Having a calculated gap between the blinds instead of the edges touching can help to alleviate this to a certain degree, or you may need to consider opening the blinds to different levels.Measuring for Finished Blind Widths
With either option your blind will need to be set forward enough in the window for the back of the blind to clear any window catches or handles, so that nothing obstructs it from going up and down freely and easily. If your blind is obstructed by catches or handles, it can snag on them potentially causing damage to the blind itself or to the operating cords. You will also need to consider the size (depth front to back) of the type of header rail that your Roman blind is going to be fitted on, as the front of the header rail is the position at which your blind will hang and therefore the point at which you need to measure for it. If for example, the thickness of the header rail is 40mm (approx 1 ½ “) from front to back, then even if it flush against the window frame and doesn’t need to moved forward to clear the catches and handles, then you will need to take your blind measurements 40mm (1 ½”) forward of the window frame. If you need to set it forward a little more to clear the handles and catches, let’s say by another 10mm (½” ) for example, then the front of your blind will need to be a total of 50mm (2 ½”) forward of the window frame (40mm + 10mm = 50mm); so this will be the position at which you need to make your width measurements.
Using A Template For Accuracy
To make the measuring easier and to ensure that you take any guess work out of it and arrive at an accurate measurement, we recommend making a paper or cardboard ruler template of this 50mm 9example only) measurement. Starting with the top left 45 degree angle of the bay, offer one ruler template up to the ceiling of the bay, flush against the window frame of the centre window and one against the ceiling and frame of the side window. Slide them towards the corner angle until they meet or cross over slightly. The point at which the two front edges cross is the point where your blinds will meet if you are doing them without a gap between. Put a small pencil mark at the corner point or, where possible, draw a faint pencil line along the front edge of the ruler templates to trace the corner outline. Repeat the operation at the top right corner of the window. The measurement between the two corner points that you have marked on the ceiling of the bay window will be the finished width of the centre blind if you are planning to have the edges touching. If you want a gap between the blinds then knock a small amount off either side of the blind to suit your desired look. This is really down to personal preference and the only consideration is that you don’t make the allowance so big that you can see the line where the window frame meets the edge of the glass, as this would not be a desirable look.Measurements of Your Side Blinds
To calculate the measurements of your side blinds if you want them touching, measure from the corner point, along the template line, to where you want the outer edge of the blind to finish. If you want the blinds to have gaps between then again knock off an allowance that suits the look that you are after, giving the same consideration to the amount you knock off the measurement as with the centre blind above, to ensure you do not see any of the glass beyond the sides of the blind.
Measuring for Roman blinds in a ‘Boxed Bay’
Planning and measuring for Roman blinds in a ‘Boxed Bay’ window – Boxed bay windows are probably the most awkward type of bay to successfully install Roman blinds into. The 90 degree corners present a few measuring challenges and you need to give careful consideration to how and where your blinds meet in the 90 degree square corners of a boxed bay window. The folds on Roman blinds stack one on top of each other when they are pulled up into the fully raised (open) position, creating a certain amount of bulk or volume at the top of the window.
Parallel Blinds and Potential Crushing
So, in a situation where you have blinds directly next to or touching each other you will be presented with a crushing issue where all the folds meet. Don’t let this put you off having Roman blinds in your boxed bay though, as there is a way around it and Roman blinds can look very smart and effective in a square bay. To alleviate the stacking issue you simply need to consider opening the blinds to different levels. This usually means having the main centre blind pulled up into the fully-stacked (or open) position, but having the two side blinds only partially pulled up. Rather than pulling them up completely into the fully raised position, just leave them down far enough for their stack of folds to sit just below the stack of folds of the centre blind. This gives a little symmetrical interest and balance to the window, looks quite acceptable and often very effective. Here’s how to plan and measure: Measuring Roman blinds to meet in the corners of a boxed bay window. This is probably the most popular and widely used method of measuring and installing Roman blinds into a square bay. There are other ways which involve overlapping the front and side blinds but these methods are complicated and nowhere near as successful or pleasing to the eye.Adjoining Corners of Side and Front Edge
The side edges of the blinds and the front corner edges of the header rails need to meet in the corners of the bay window when they are installed. Using this method, when the blinds are down in the fully extended (closed) position, the edges of the blinds meet in the internal corners of the bay, with little or no gap between them. Leaving gaps is not a desirable look in a squared bay window as it creates very visible and unattractive looking spaces through which you will be able to see the window glass and through which a considerable amount of daylight will penetrate. It also reduces privacy levels too. Measuring needs to be quite accurate and you will be measuring for finished blind sizes rather than recess measurements. The main centre blind needs to be set far enough forward in the window recess for the back of the blind to clear any window catches or handles, so that nothing obstructs it from going up and down freely and easily. If any of your blinds are obstructed by catches or handles, they can snag on them potentially causing damage to the blind itself or to the operating cords.
Considering Depth Measurements
You will also need to consider the size (depth front to back) of the type of header rail that your Roman blind is going to be fitted on, as the front of the header rail is the position at which your blind will hang and therefore the point at which you need to measure for it. If for example, the thickness of the header rail is 40mm (approx 1 ½ “) from front to back, then even if it is flush against the window frame and doesn’t need to moved forward to clear the catches and handles, then you will need to take your blind measurements 40mm (1 ½”) forward of the centre window frame . If you need to set it forward a little more to clear the handles and catches, let’s say by another 10mm (½”) for example, then the front of your blind will need to be a total of 50mm (2 ½”) forward of the window frame (40mm + 10mm = 50mm); so this will be the position at which you need to make your width measurements.How To Use Your Templates
To make the measuring easier and to ensure that you take any guess work out of it and arrive at an accurate measurement, we recommend making two paper or cardboard ruler templates of your clearance measurement (in our example - 50mm). Offer one of the templates up to the ceiling of the bay, flush against the window frame of the central window in the top left hand corner of the bay to begin with; and then offer the other template up to the ceiling of the side window and flush against the frame. Slide the templates together into the internal 90 degree corner of the bay window until they meet or cross over slightly. The point at which the two front edges cross is the point where your blinds will meet. Put a small pencil mark at the corner point or, where possible, draw a faint pencil line along the front edge of the ruler templates to trace the corner outline. Repeat the operation at the top right corner of the window. The measurement between the two corner points that you have marked on the ceiling of the bay window will be the finished width of the centre blind.


